Monday, April 4, 2011
Difficulty Levels
We have now covered each of the main folds and used several examples on how to fold them. You should be ready to try some of the other models on this website. To help you, I have given a difficulty rating for each of them. This is based on both the OUSA difficulty system and that used in most of John Montroll's origami books.
One star : 
- These models are the simplest ones on this site. They correspond to the OUSA classifications of simple and low intermediate.
Two stars : - These models are moderately difficult and should not really be attempted by beginners to origami. They correspond to the OUSA classification of intermediate.
Three stars : - These models are fairly difficult and should only be attempted by those who are fairly comfortable with folding. Some stages are quite tricky. They correspond to the OUSA classification of high intermediate.
Four stars : - These models are difficult to fold, either due to difficult sequences, a large number of delicate folds, or due to the thickness of the paper achieved. Only experience folders should have a go, and large sheets of paper are best used or the model will frequently tear or collapse. They correspond to the OUSA classification of complex.
Until now, most of the models have been one star difficulty.
Origami Basics 11
The sink fold
A sink fold is made when the centre of the paper is folded inside the rest of the model. You may have to unfold some of the model to accomplish this. Once you have made the fold, everything usually pops back into place. A thick arrow usually shows you where to push with your finger. This can sometimes be very difficult, so don't be afraid to unfold as much of the model as you need to.
 | This is one version of how to fold a Pajarita, a traditional Spanish model sometimes called a Hobby-horse in the West. It starts by using a waterbomb base. The sink in step 2 is good practise to learn how to sink fold. A tricky outside reverse fold is required in step 8. |
Origami Basics 10
The Frog base.
 | This base is more complicated than the previous ones. As well as having several squash folds, you have several petal folds, too. The base itself has four long points, four short flaps and a long central point. |
 | The traditional frog uses the frog base and several reverse folds to form the legs. The final step involves blowing into a hole at the bottom and inflating the model. I think that the frog looks rather nice as it is however. Inflating it also looks a little rude, too. |
Origami Basics 9
The Petal fold and the Bird base
In a Petal fold, a layer is lifted, opened up and flattened. It usually consists of two mountain folds and a valley fold.
 | The Bird base is probably the most commonly used base in origami. It starts off with a preliminary base, and both sides are then Petal folded upwards. This creates a base with four long points that can be folded into many different forms. |
 | The flapping bird is one of the most well-known origami models. After folding the bird base, three more folds create the flapping bird. To get it to flap properly, you will need to curl the wings slightly. Rub your thumb along the outside of them. If you hold where shown, pulling the tail causes the wings to flap. |
Origami Basics 8
The Double Rabbit ear fold
This fold is a bit like bending a drinking straw in half. It is used to narrow a triangular flap to produce a much thinner flap. It is a good way to create thin legs on an animal.
 | To practise this fold, here is a variation of a traditional origami swan. The crease in step 3 should make it easier to complete the Double rabbit ear fold. An inside reverse fold is also used to form the head. |
Origami Basics 7
The Rabbit ear fold and the Fish base
In a rabbit ear fold, a corner of the paper is pinched in half to form a new point. This looks a little bit like a rabbit's ear.
 | The Fish base uses two rabbit ear folds. It has two long flaps and two short flaps that can be folded. |
 | This simple fish model uses several of the folds that you have learnt so far. As well as folding the fish base to start, you will need so fold some reverse folds to create the tail properly. Use a large sheet of paper to start with or the head may split open as you fold step 6, a rather difficult reverse fold. |
Origami Basics 6
The Squash fold and the Preliminary base.
In a squash fold, some paper is opened out, and then flattened. A large thick arrow usually shows you where to press down.
 | The Preliminary base is one of the four main bases of origami, but is not used as much as the other four. This is because it is a halfway step towards forming the Bird base and the Frog base. |
 | This simple model is folded from a Preliminary base and incorporates several squash folds. The final step is rather fun as you have to open out the square base to make the model 3D in shape. It makes an attractive container. |
Origami Basics 5
The Waterbomb base
There are several 'bases' commonly used in origami. These are a series of steps that lead up to an intermediate model. Many different models can then be formed from this base. The most commonly used bases were named by Samuel Randlett and Robert Harbin and these are; the Waterbomb base, the Preliminary base, the Fish base, the Bird base and the Frog base. We will start with the Waterbomb base. | The most commonly made model from the Waterbomb base is the Waterbomb. This is a simple origami cube. I rather like the final step which involves blowing into the small hole at the bottom and inflating the whole model. The Waterbomb can hold quite a fair bit of water, which can be poured into the hole, and is apparently quite aerodynamic...so I am told. |
Origami Basics 4
Crimp folds
A crimp fold is a form of pleating. It comprises of two reverse folds made at one. If you look at the beak on the penguin model, this can be folded with a crimp fold, rather than the pleat in step 6.
 | As well as practising to fold the penguin's beak by using a crimp fold, you can also try this simple chick model. The outside reverse fold in step 4 forms a nicely shaped bird head, and the crimp in step 7 forms the beak. This is a common method of shaping a bird's head. |
Origami Basics 3
Reverse folds
A reverse fold is where a tip is folded so that ends of the paper lie in between different layers, so that two or more layers are folded along a single crease. Now this sounds rather more complicated than it actually is!There are two sorts of reverse fold. The most common is an inside reverse fold. Some paperfolders call this a hood-fold.
 | There are many uses for an inside reverse fold. To practice, here is a simple duck model. Three different sorts of reverse fold are used, one to make the tail, one to fold the chest and one to form the beak. Click here for diagrams |
 | This next model uses one outside reverse fold to form the head. Notice that I have used a sheet of origami paper that is black on one side and white on the other. This produces a two-tone model. This use of origami paper makes models look very attractive. Some paperfolding experts can design models such as tigers and zebras where the stripes are a different colour to the rest of the model. |
Origami Basics 2
Valley folds and Mountain folds.
These are the two simplest folds in origami. A valley fold means fold in front along the line. This is represented by a dashed line.
 | This is a simple model to start you off with. It is a simple Samurai helmet, part of the armour worn by a Japanese warrior. It is modelled here by a cuddly Tasmanian Devil. All the folds are valley and mountain folds. A 12" square of paper produces a hat 8" wide, which should be big enough for most heads. |
Origami Basics 1
This section is intended for the beginner. It introduces all of the major folds in origami and shows how they are done. It also provides a large number of simple models that aim to allow one to practice these folds. By the time you have finished this section of my web site, you should be able to fold most of the models in the other sections. If you cannot complete a particular fold or section, please do not give up. Keep trying! It is unusual for someone to get an entire model correct at the first time. You will need plenty of practice to make perfect.
There have been many ways in which origami instructions have been diagrammed in the past. About fifty years ago, an international system began to come into use. This is the Yoshizawa-Randlett-Harbin system, which is used in almost all modern origami books. I have a few Japanese paperfolding books and although I cannot read the language, I can understand the diagrams, because they use this international system.
On origami diagrams, arrows show you which direction the paper is to be folded in. It is important to understand which direction the arrow is telling you to fold. Shown here is a picture of all the arrows that you will see on this site and in most origami books. You will see how these are used on the next few pages.
More info at: http://www.fishgoth.com/origami
Paper and arrows
Most origami uses a single uncut square of paper, and this website is no exception. You can buy origami paper from most art shops and some origami websites. You can also cut a square from ordinary paper.There have been many ways in which origami instructions have been diagrammed in the past. About fifty years ago, an international system began to come into use. This is the Yoshizawa-Randlett-Harbin system, which is used in almost all modern origami books. I have a few Japanese paperfolding books and although I cannot read the language, I can understand the diagrams, because they use this international system.
On origami diagrams, arrows show you which direction the paper is to be folded in. It is important to understand which direction the arrow is telling you to fold. Shown here is a picture of all the arrows that you will see on this site and in most origami books. You will see how these are used on the next few pages.
Tools of the Trade
Origami is a pure artform in that it needs only one material a sheet of paper. So is that all that the aspiring paperfolder needs? Not quite; this page describes the tools that I most commonly use when crafting an Origami model.
Paper
This is the most important thing to start with! However, there are many different types to use. This sort that I most commonly use is simple white 40 g/m sq. printer paper. This is very cheap to buy in large amounts and is useful for most models. The best thing about it is that it is disposable when designing a model, I will get through several draught models first. If I used commercial Origami paper for each one, this would be a very expensive artform.| Standard 40 g/m sq. paper comes in a variety of sizes and colours. A lot of my display models are folded from coloured A3 sized paper. This can be decorated, painted, wetfolded, and is fairly good to fold. Origami paper can be bought from various shops. This comes in packs of various sizes and is usually coloured one size, and white on the other. This is thinner than standard printer paper, and a little more durable. It is also better for ‘two-tone’ models in which both the coloured and the white size are used, for example, to create a zebra’s stripes. | 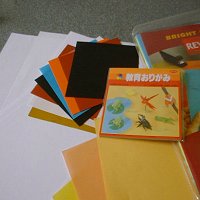 |
Foil backing
| For complex models such as insects, I prefer to use foil-backed paper. This can be bought in a few gift shops but is expensive and difficult to find. I usually make my own. To do this, I buy very thin tissue paper and kitchen foil. By carefully spraying both sides with an art/craft glue and positioning the tissue, I can create a ‘paper’ ideal for complex models. This is rather messy, hence the newspaper in the picture. As this is very thin and durable, models that would become too thick to fold out of normal paper become much more appealing. It also retains its shape well, and insect legs and antennae can be molded in a way that one couldn’t do with paper. | 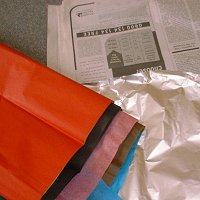 |
Cutting
| Although Origami paper comes in squares, most other paper doesn’t. As a result, it has to be cut if the model requires a square to start from. Although a good pair of scissors is an absolute must, I prefer to use a blade and a steel ruler. This is much more accurate. Another tool is seen here this is a circular blade attached to a ruler designed for cutting straight edges to measure. Finally, a good cutting mat is a far more sensible surface to cut upon than the family diner table. | 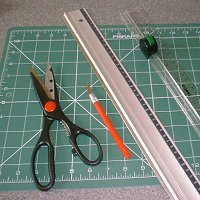 |
Other tools
| Finally, a selection of other tools comes in handy. Paper glue is useful for display purposes. For example, most of my dinosaurs have small shapes of paper glued on for eyes. A variety of inks, brushes and pens are a staple tool of mine. Before folding a model, I will often decorate a square of paper in various ways drybrushing, inkwashing, painting, etc. In this way, standard coloured paper looks so much more appealing. Lastly, art/craft spray glue is handy for texturing, foil backing and so much more. | 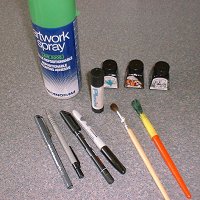 |
Types of Origami
Action origami
Origami not only covers still-life, there are also moving objects; Origami can move in clever ways. Action origami includes origami that flies, requires inflation to complete, or, when complete, uses the kinetic energy of a person's hands, applied at a certain region on the model, to move another flap or limb. Some argue that, strictly speaking, only the latter is really "recognized" as action origami. Action origami, first appearing with the traditional Japanese flapping bird, is quite common. One example is Robert Lang's instrumentalists; when the figures' heads are pulled away from their bodies, their hands will move, resembling the playing of music.
Modular origami
Chinese paper folding includes a style called 3D origami where large numbers of pieces are put together to make elaborate models. Sometimes paper money is used for the modules. This style originated from some Chinese refugees while they were detained in America and is also called Golden Venture folding from the ship they came on.Modular origami consists of putting a number of identical pieces together to form a complete model. Normally the individual pieces are simple but the final assembly may be tricky. Many of the modular origami models are decorative balls like kusudama, the technique differs though in that kusudama allows the pieces to be put together using thread or glue.
Wet-folding
Wet-folding is an origami technique for producing models with gentle curves rather than geometric straight folds and flat surfaces. The paper is dampened so it can be moulded easily, the final model keeps its shape when it dries. It can be used, for instance, to produce very natural looking animal models
Pureland origami
Pureland origami is origami with the restriction that only one fold may be done at a time, more complex folds like reverse folds are not allowed, and all folds have straightforward locations. It was developed by John Smith in the 1970s to help inexperienced folders or those with limited motor skills. Some designers also like the challenge of creating good models within the very strict constraints.
Origami Tessellations
This branch of origami is one that has grown in popularity recently, but has an extensive history. Tessellations refer to the tiling of the plane where a collection of 2 dimensional figures fill a plane with no gaps or overlaps. Origami tessellations are tessellations made from a flat material, most often paper, but it can be from anything that holds a crease. The history of costuming includes tessellations done in fabric that are recorded as far back as the Egyptian Tombs.
Fujimoto was an early Japanese origami master who published books that included origami tessellations and in the 1960s there was a great exploration of tessellations by Ron Resch. Chris Palmer is an artist who has extensively explored tessellations and has found ways to create detailed origami tessellations out of silk. Robert Lang and Alex Bateman are two designers who use computer programs to design origami tessellations. The first American book on origami tessellations was just published by Eric Gjerde and the field has been expanding rapidly. There are numerous origami tessellation artists including Chris Palmer (U.S.), Eric Gjerde (U.S.), Polly Verity (Scotland), Joel Cooper (U.S.), Christine Edison (U.S.), Ray Schamp (U.S.), Roberto Gretter (Italy), Goran Konjevod (U.S.),and Christiane Bettens (Switzerland) that are showing works that are both geometric and representational.
Kirigami
In a variant of Origami, Kirigami, it is allowed to make cuts in the paper being folded. In traditional Origami, there was no Kirigami. Kirigami first emerged as a version of Origami, and then after it emerged, in the 20th century CE it was named Kirigami, and the practice of Kirigami was distinguished and disambiguated from "pure Origami".
Techniques and Materials
Techniques
Many origami books begin with a description of basic origami techniques which are used to construct the models. These include simple diagrams of basic folds like valley and mountain folds, pleats, reverse folds, squash folds, and sinks. There are also standard named bases which are used in a wide variety of models, for instance the bird base is an intermediate stage in the construction of the flapping bird.
Origami paper
Origami paper, often referred to as "kami" (Japanese for paper), is sold in prepackaged squares of various sizes ranging from 2.5 cm to 25 cm or more. It is commonly colored on one side and white on the other; however, dual coloured and patterned versions exist and can be used effectively for color-changed models. Origami paper weighs slightly less than copy paper, making it suitable for a wider range of models.Almost any laminar material can be used for folding; the only requirement is that it should hold a crease.
Normal copy paper with weights of 70–90 g/m2 can be used for simple folds, such as the crane and waterbomb. Heavier weight papers of (19-24&nb 100 g/m2(approx. 25 lb) or more can be wet-folded. This technique allows for a more rounded sculpting of the model, which becomes rigid and sturdy when it is dry.
Foil-backed paper, just as its name implies, is a sheet of thin foil glued to a sheet of thin paper. Related to this is tissue foil, which is made by gluing a thin piece of tissue paper to kitchen aluminium foil. A second piece of tissue can be glued onto the reverse side to produce a tissue/foil/tissue sandwich. Foil-backed paper is available commercially, but not tissue foil; it must be handmade. Both types of foil materials are suitable for complex models.
Washi (和紙) is the traditional origami paper used in Japan. Washi is generally tougher than ordinary paper made from wood pulp, and is used in many traditional arts. Washi is commonly made using fibres from the bark of the gampi tree, the mitsumata shrub (Edgeworthia papyrifera), or the paper mulberry but also can be made using bamboo, hemp,rice, and wheat.
Artisan papers such as unryu, lokta, hanji, gampi, kozo, saa, and abaca have long fibres and are often extremely strong. As these papers are floppy to start with, they are often backcoated or resizedwith methylcellulose or wheat paste before folding. Also, these papers are extremely thin and compressible, allowing for thin, narrowed limbs as in the case of insect models.
Paper money from various countries is also popular to create origami with; this is known variously as Dollar Origami, Orikane, and Money Origami.
Tools
It is common to fold using a flat surface but some folders like doing it in the air with no tools especially when displaying the folding. Many folders believe no tool should be used when folding. However a couple of tools can help especially with the more complex models. For instance a bone folder allows sharp creases to be made in the paper easily, paper clips can act as extra pairs of fingers, andtweezers can be used to make small folds. When making complex models from origami crease patterns, it can help to use a ruler and ballpoint embosser to score the creases. Completed models can be sprayed so they keep their shape better, and of course a spray is needed when wet folding.
What is Origami?
Origami (折り紙, from ori meaning "folding", and kami meaning "paper"; kami changes to gami due to rendaku) is the traditional Japanese art of paper folding, which started in the 17th century AD at the latest and was popularized in the mid-1900s. It has since then evolved into a modern art form. The goal of this art is to transform a flat sheet of material into a finished sculpture through folding and sculpting techniques, and as such the use of cuts or glue are not considered to be origami.


Origami Triceratops
Subscribe to:
Comments (Atom)